Terraform Fundamentals - Your first configuration
Learn how to launch your first AWS EC2 instance using Terraform.
If you’ve made it this far, congratulations! You now have Terraform installed and understand the importance of versioning. Now it’s time to deploy real infrastructure.
In this post, I will show how to launch your first AWS EC2 instance using Terraform and learn how the whole flow works—from writing configuration to destroying your resources safely. I am assuming that you are using a Windows 11 machine and have AWS CLI installed (if not, check out the detailed installation instructions here).
Follow my journey of 100 Days of Red Team on WhatsApp, Telegram or Discord.
Set up AWS policy and credentials
First, lets create a restricted AWS IAM policy that will grant only the required permissions.
Go to IAM > Policies > Create Policy.
Switch to the JSON tab and paste:
{
    "Version": "2012-10-17",
    "Statement": [
        {
            "Sid": "EC2CoreActions",
            "Effect": "Allow",
            "Action": [
                "ec2:RunInstances",
                "ec2:DescribeInstances",
                "ec2:DescribeInstanceTypes",
                "ec2:TerminateInstances",
                "ec2:DescribeVolumes",
                "ec2:CreateTags",
                "ec2:DescribeTags",
                "ec2:DescribeInstanceAttribute",
                "ec2:DescribeImages",
                "ec2:DescribeKeyPairs",
                "ec2:DescribeSecurityGroups",
                "ec2:DescribeSubnets",
                "ec2:DescribeVpcs",
                "ec2:AllocateAddress",
                "ec2:AssociateAddress",
                "ec2:ReleaseAddress",
                "ec2:DescribeAddresses",
                "ec2:DescribeInstanceCreditSpecifications"
            ],
            "Resource": "*",
            "Condition": {
                "StringEquals": {
                    "aws:RequestedRegion": "us-east-1"
                }
            }
        }
    ]
}
This policy minimizes blast radius in case of compromised credentials or misconfigured resources. If an attacker gets access to your Terraform user, they’re confined to a specific region and specific permissions.
Click Next, name the policy something like
TerraformEC2Access, and click Create Policy.
Next, lets create a new IAM user for the purpose of this exercise.
Go to IAM > Users > Create user
Enter the username as
terraform-userand click Next.On the permissions screen, choose Attach policies directly.
Select the
TerraformEC2Accesspolicy you just created and click Next.In the Review and create screen, click Create user.
Click on the newly created user,
TerraformEC2Access.Click on Create access key.
Select Local code.
Check the Confirmation check box and click Next.
Click Create access key.
Click Download .csv file to save a local copy of credentials of the newly created user.
Click Done.
Security tip: Never use your root credentials. Always use an IAM user with limited access.
Finally, lets configure AWS CLI.
aws configureProvide:
Access Key ID
Secret Access Key
Region (e.g.,
us-east-1)Output format (you can choose
json)
This will write your credentials, selected region and output format to:
~/.aws/credentials
~/.aws/config
A couple of security tips before moving on:
Never hardcode credentials in
.tffiles.Use environment variables or AWS CLI profiles instead.
Store secrets in a vault or use Terraform Cloud's secure storage in production setups.
You’re now ready to start building!
Create your first Terraform project
Create a new directory:
CMD:
mkdir terraform-hello-world && cd terraform-hello-world

PowerShell:
mkdir terraform-hello-world; cd terraform-hello-world
Inside it, create a file called main.tf and paste this:
provider "aws" {
  region = "us-east-1"
}

resource "aws_instance" "hello" {
  ami           = "ami-0e449927258d45bc4" # Amazon Linux 2 AMI in us-east-1
  instance_type = "t2.micro"

  tags = {
    Name = "TerraformHelloWorld"
  }
}
Run your first Terraform commands
From the directory with main.tf, run the following:
1. Initialize
terraform initThis sets up Terraform’s working directory and downloads the AWS provider.
2. Preview the Plan
terraform planThis shows what Terraform will do—without actually doing it.
3. Apply (Build infra)
terraform applyType yes when prompted. Terraform will:
Authenticate with AWS
Provision the EC2 instance
Since we have not yet created any SSH keys or added output variable to the Terraform configuration file, the only way to confirm whether the EC2 instance was actually created is to login to the AWS management console > EC2 > Instances. You should see a running instance there.
4. Destroy (Cleanup)
terraform destroyType yes to tear everything down. This is great for:
Saving on AWS costs
Practicing clean ops
Leaving no trace in test environments
Again, to verify whether the EC2 instance was actually destroyed or not, login to the AWS management console > EC2 > Instances. You should see a terminated instance there.
How does this work?
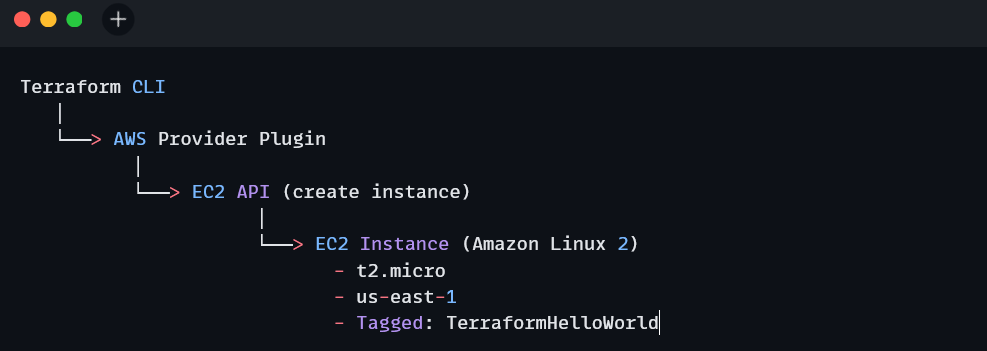
Here’s how the workflow provisioned your EC2 instance:
You described what you wanted in main.tf, and Terraform took care of turning it into real infrastructure. That’s the core power of Infrastructure as Code.
TL;DR
We launched the first AWS EC2 instance using Terraform. Learnt how to securely configure AWS credentials, wrote a basic provider and resource block, and used the core Terraform commands: init, plan, apply, and destroy.
Follow my journey of 100 Days of Red Team on WhatsApp, Telegram or Discord.


